- Comparison Satellit 700/Sony ICF SW77
- Satellit 700 Frequency mods (in english!)
- Satellit 700 Frequency mods (in german)
- Grundig Satellit 700 FAQ file
- RDS info (S.700 has this feature)
- RDS Test Mode info (S.700/technical)
- Memory upgrade information / S.700
- Centre BFO(SSB)/no-hum modification
- Non-muted tuning modification
- DEMO MODE ( scrolling text/show-off :)
Other Reviews and Tips:
- Check out Christoph Lorenz nice review
Truly a world-class portable, digital receiver. Excellent sensitivity and selectivity. Digital display with two separate clock/timers, signal strength meter, band selection, frequency readout, and user-definable eight-character "name" for each memorized station. Has RDS circuitry on FM to decode the newlyphased -in system for identifying stations by call letters, format, etc. 512 memory positions, upgradable to 2048. Tunes in .1 kHz increments. Selectable wide/narrow bandwidth for AM mode reception. Tunes MW in 9 or 10 kHz steps. Keypad frequency entry. Receives USB and LSB. Synchonous detector helps pick difficultto -receive stations out of the crowd. Selectable automatic/manual gain control. Covers LW (150-353 kHz), MW (528-1611 kHz), SW (1612-30000 kHz), and FM (87.5-108 MHz). Excellent audio output, with separate treble and bass controls. Stereo through headphones or external speakers. Line-level out (left and right), external antenna, and 12 VDC-in jacks. Local/DX switch. Built extremely rugged. Multi-national power supply included.
An outstanding performer, and worth the price to a serious SWL or DX'er who requires portability.
Purchased from Universal Radio for $479 in April, 1993.
Both of the receivers you are looking at are pretty solid. The Sony is
slightly smaller and has a somewhat more "finished" feel about it. The
Grundig is SOLID with a much better sound. Neither is as good a SW signal
receiver as the previous Sony, the '2010 (2001). However, they both have very
advanced features; multiple (and in the Grundigs case, expandable) memories with
alphanumeric tags so that you have a name as well as a frequency, all sorts of
memory grouping and scanning etc. The Grundig has good RDS ident. on it's FM
band, but I have a feeling that this isn't used much, if at all, in the US. If
you intend to buy second-hand, be very wary of the SW77 - the early version was
pretty flakey. The later version is better but still not as good as the '2010.
I think that the choice comes down to "feel". They are both quite
complex to use, but both work as advertised. Try 'em both as they have quite
distinct operational methods. If sheer performance on SW is the main point for
you, compare them with the Sony ICF2010. You'll buy it and save some loot !
For what it's worth, I tried them both and settled on the Grundig. I have my
Satellit 700 in daily use and it's performed without a hitch.
My reasons for the choice were:
I hope this splurge hasn't clouded the issue for you.
Editor's Note:
I have one of these radios and love it! I sent the following message to someone
just after I bought it.
I just recently forked out $500 and bought a Grundig Satalit 700. The sound
from the radio is truely impressive! I have always wondered why broadcasters put
music on shortwave, because it alway sounded like garbage. However with the 700
I can listen and enjoy the music. The 700 has Bass and Treble controls, which
improve the sound quality but the Automatic Gain Control most likely does the
most toward improving the sound (I'm not an expert, so this is just a guess!).
Anyway my Wife regularly listens to music coming from a 60m band radio station
in Guatemala, and can enjoy the sound. However there are some bad points. It is
programable, but I have not worked out how to do it yet. Well I tried once and
gave up. This is not too bad though, because BBC, Deutche Welle, and about 10
others are stored in a ROM table. And these frequences actual work (i.e. they
are the frequencies for North America and NOT Germany).
Also I connected a long wire antenna and found my local AM station on shortwave.
I guess the front-end is not good enough to sort the signals out when coming
from a large antenna. But don't worry about this either.
If you only want to listen to the biggies like BBC, Deutche Welle, you won't
need an external antenna. I am planning to put a Pre-selector between The Radio
and the Antenna, and I think this will cure the problem of AM stations on
shortwave and cut out some interference. Finally I recommend this radio to you.
I'm sure you will have hours if enjoyment from it.
- Satellit 700 Frequency mods (in english!)
Quite easy ,really. From the original german documentation it did not look very simple ,as it stated one had to specify certain frequencies at certain memory banks to make it all work.. NOT SO! Please read on:
Step 1. STORE _any_ SW frequency in _any_ free Memory Bank
Step 2. Key in (or collect) _any_ FM frequency and keep it active.
Step 3. Key in the number of memory bank with your one SW frequency (ref. step 1.) followed by "STORE" and "CL".
Step 4. Use "TUNING WHEEL" (only) to tune. You are now able to tune out of range FM (Approx. 77 - 109 MHz )
A few tips for easier operation: It is easier to enter 87.5MHz (Step 2.) when tuning into lower frequencies ,or 108MHz when tuning above. You can also store 87.5/108MHz in _same bank_ as the SW frequency! (Step 1.) Just remember to use "SEARCH SELECT" to highlight the SW frequency when performing Step 3.
I would appreciate it if you share any other findings regarding frequency mods or any other mods. I think there are several others to be done.
- Satellit 700 Frequency mods (in german)
The following info is collected
from Thiecom in Germany :
http://www.thiecom.de/sat700.htm
(in german language only)
"Frequency extention MODS"
Bitte beachten Sie die jeweiligen Bestimmungen und Gesetze Ihres Landes. Zuwiderhandlungen können bei Strafe verboten sein.( Frequenzerweiterungen)
Obwohl die Frequenzanzeige nach der Modifikation von ca. 40,3 bis 750 Mhz geht, kann nur der Bereich 78,1 - 109,2 Mhz genutzt werden.
Gehen Sie wie folgt vor:
In einem Memofile muß mindestens eine Kurzwellenfrequenz gespeichert sein.
Liegt z.B. auf Memofile 1 Speicherplatz 3, 1. Rang die Frequenz 6075 kHz, so ist folgendes zu tun:
Mit 3 STORE den betreffenden Speicherplatz anwählen und, falls die Kurzwellen-Frequenz auf Rang 1 liegt, direkt mit CL wieder verlassen. Ist dieses nicht der Fall, muß die Frequenz erst mit SEARCH SELECT angewählt werden.
Nun kann mit dem Abstimmknopf der erweiterte Bereich abgestimmt werden.
Dieselben Schritte kann man auch mit Mittelwellen und Langwellen Frequenzen machen, was den Bereich noch weiter verschiebt, aber sinnlos ist, da null Empfindlichkeit.
RDS -modus:
Der RDS-Modus wird durch langes Drücken (ca. 3 Sek.) der SYNCH-
Taste aktiviert. Durch anschließendes Drücken von USB, LSB bzw.
der Bandbreitentaste können verschiedene Funktionen angezeigt
werden. Das S-Meter zeigt im RDS-Mode ständig die RDS-Signal-
qualität an.
DEMO-modus:
Der Demo Mode wird ein- und ausgeschaltet durch die Eingabe im
ausgeschalteten Zustand von 123456 und anschließendem Einschalten.
Frequency extention MODS
Die Frequenzerweiterung wird folgendermaßen durchgeführt:
1: Auf Pos. 1 von Speicher 64 - 87.6Mhz einspeichern
2: Auf Pos. 2 von Speicher 64 - 30.0Mhz einspeichern
3: Dann Speicher 64 aufrufen
4: Dann 64 und Taste FREE drücken (die Sternchen im Display
erscheinen)
5: Dann Search Select nach rechts drücken und anschließend CL
drücken
6: Nun kann man mit der Handabstimmung von ca. 76 Mhz bis ca. 114
Mhz abstimmen. Nach dem Ausschalten oder nach dem Drücken
einer Speichertaste muß die Prozedur ab Pkt 3. wiederholt
werden.
Achtung! Keine Garantie und Haftung auf die Angaben bzw. auf Fehler, Schäden, etc. Sie machen es auf Ihr eigenes Risiko!!
Sollten Sie diese Seite direkt aufgerufen haben, können Sie unter www.thiecom.de unsere Homepage besuchen.
- Grundig Satellit 700 FAQ file
The info below is collected from the
Radio Solutions site at: http://members.home.net/rnewell/
Welcome to the Grundig Satellit 700 FAQ file. This FAQ covers the questions most frequently asked regarding this receiver in terms of its capabilities and use. It is intended to answer questions of interest to people considering the purchase of a Satellit 700, and those of us who have already purchased the radio, and are interested in learning how to use all its capabilities. It is meant to supplement the Grundig operating manual, which was translated from the original German, and is a little tough to follow, Hopefully these instructions are a little clearer. In the event that you are purchasing a used Satellit 700 with no manual, this file may help you out quite a bit.
2. Description & Specifications The Grundig Satellit 700 is a portable world band receiver which offers advanced features such as a Digital frequency display, Synchronous Detector, dual IF bandwidths, switchable auto/manual AGC, RDS, separate Bass and Treble controls, provisions for External Antenna use, line level recording output and a relay switch that allows for the control of an external tape recorder.
Dimensions: Length: 11.8" (300mm) Height: 6.7" (170mm) Depth:
2.75" (70mm) Weight: 4 Lb. (1.8 kg) (No Batteries) List Price: US $450
Typical Used US $325-$375, depending on condition & accessories.
Price: Frequency AM: 150 kHz-353 kHz; 528 kHz-30,000 kHz Coverage: FM: 87.5
MHz-108.0 MHz Modes AM, Synchronous AM, LSB, and USB. A Clarifier control is
Available: provided for improved SSB reception.
Broadcast FM (Stereo available via headphone jack) Tuning AM: 1.0 kHz Precision: AM Sync/SSB: 0.1 kHz
FM: 25 kHz AM 1st IF: 54.5 MHz AM 2nd IF: 450 kHz FM: 10.7 MHz IF Filter Wide: 6.8 kHz (-6 dB) Bandwidths: Narrow: 4.0 kHz (-6 dB) Audio Output 1 watt on internal speaker Power: 2 x 1.5 watts into 7.5 ohms on external speakers
Power The Satellit 700 uses 4 alkaline or Nickel Cadmium Size 'D' Requirements: cells. According to Grundig, Nickel Cadmium cells have a life of ~25 Hours per charge. Alkaline batteries have an estimated life of ~90 Hours. When nickel cadmium batteries are used, they may be recharged via the included NR90 AC power adapter without removing them from the radio. The NR90 adapter is switchable between 110Vac/220Vac operation and has provisions for standard US power outlets as well as those of European origin. The Satellit 700 may also be operated from External 9-12 V power sources.
Headphone Jack: 3.5mm stereo jack plug, output is rated for headphone impedance from 32 - 2K ohms.
Memory: The Satellit 700 comes with one external MEMOFILE (EEPROM) as standard equipment and this memory IC can store 2048 bytes of information. This translates to 64 station memory positions, or pages, with storage space for up to 8 alternate frequencies per broadcaster (512 Frequencies in all). The Satellit has provisions for memory expansion, and may accommodate up to 4 external MEMOFILEs (EEPROMS) which expand its storage capabilities to 256 pages with 8 alternate frequencies per page (2048 Frequencies).
Memofile Part Xicor X24C16-P3 or Microchip 24LC16B P (8 Pin DIP package) Number: 3. User Interface:
3.1 Display The Satellit 700 offers a large LCD interface for the user, and displays the following information when the radio is turned on:
Frequency: The Satellit 700 displays the currently tuned frequency to the nearest 1kHz (AM) or 100 Hz (SSB or AM Sync). Band: When tuned within an international broadcast or amateur radio band, the Satellit will display the currently selected band (in meters). Time: The Satellit has two internal clocks, one of which is displayed at all times. Pressing the TIME I/II button toggles the display of the two clocks.
Signal A 16 segment LCD is used to indicate signal strength, and Strength: battery charge status (for three seconds following powerup) LSB,SYNC These indicators show the current mode of operation - Lower USB: Sideband, AM Sync, or Upper Sideband. If these indicators are all blank, current operating mode is AM (or FM, if tuned to the FM broadcast band)
IF Filter This indicator shows the current IF bandwidth selected. WIDE Bandwidth: bandwidth provides superior audio quality (more treble), while the NARROW bandwidth setting provides superior rejection of adjacent channel stations. EXT: This indicator shows that the antenna plugged into the EXT jack on the right side of the radio is selected. LOC: This indicator shows when the attenuator in the radio's RF input circuitry is switched on, to reduce the incoming signal level in the front-end and prevent overloading.
Man/Auto Unlike many portable radios which only provide an Automatic Gain AGC Gain Control, the Satellit 700 allows the use of either Automatic or Manual Gain Control. The manual gain settings are useful for optimizing the reception of SSB signals.
FM Stereo/ Allows switching FM Stereo broadcasts to Mono mode. This allows Mono the user to override the default Stereo selection when receiving weak FM signals to improve reception. The Satellit only has one 6" speaker, but Stereo signals are available via the headphone jack on the left side of the radio. CT MEMOFILE The MEMOFILE (EEPROM) currently selected for use.
RDS: Indicates that the currently tuned FM station is transmitting an RDS (Radio Data System) signal.
Accum: Indicates that the switch in the battery compartment is set in the Accumulator (Nickel Cadmium Rechargeable Battery) position. This indicator should NOT be on if you are using normal Alkaline batteries, because it indicates that the batteries will be charged when AC Adapter NR90 is plugged into the radio.
Auto/Sleep: This indicator shows when the radio is setup via the timers to automatically turn on and turn off. This is useful for recording programs at odd hours with a separate cassette recorder via the LINE OUT Socket.
3.2 Keypad
Power On/Off: This switch powers up and turns off the radio.
Numeric Keys: These keys are used for direct frequency entry (e.g. 5-9-7-5 FREQ/m-Band will select 5975 kHz). The numeric keys may also be used to select a band of interest (e.g. 4-9 FREQ/m-Band will select the 49M band and tune to the mid-band frequency.) The numeric keys may also be used to select the desired station from the presets stored in the MEMOFILEs (e.g. 2.4 will select the station stored in MEMOFILE #2, page #4).
FM/RDS/AF: This key is used to select the FM broadcast band or display RDS information if available. While this system has been approved by the FCC in the United States, few stations currently broadcast the signals required to activate the display of Call Letter and Format information.
AM: Select AM bands in the sequence LW -> MW-> SW ->LW -> MW -> SW etc. The last station tuned to in each of the 3 bands will be the frequency selected.
MEMO AF: Once a preset station has been called up, pressing this button will allow the listener to check other frequencies used by the same broadcaster. This allows a convenient means to check for the clearest frequency currently in use.
MONO/STEREO: Used in the FM Mode to override the Stereo default and select MONO mode. Useful for improving reception of noisy Stereo signals.
Wide/Narrow Used to select between the Wide (6.8 kHz) and Narrow (4kHz) Bandwidth: IF filters. The Wide position improves the fidelity of the signal, while the Narrow improves rejection of adjacent stations (stations 5 kHz below or above the signal of interest) at the sacrifice of some fidelity.
FREE: Displays free memory pages in the current MEMOFILE in increasing sequence for as long as you hold down the FREE button. If all memory pages in the MEMOFILE are occupied, FULL is displayed. Pressing a numeric button (to select the page of interest) and then this button for a longer period of time will clear the page (main frequency and all of the alternates).
STO: When pushed for a short period of time, this button allows the user to store the current frequency to the current MEMOFILE page selected. Pressing the button for a longer period allows the user to store an initial frequency and alphanumeric name for the page.
SYNCH: This button switches on the Satellit's AM Synchronous detection circuitry, and changes the tuning increment from 1 kHz to 100 Hz.
USB: This button switches the Satellit to receive Upper Sideband SSB communications, and changes the tuning increment from 1 kHz to 100 Hz. It also enables operation of the CLARIFIER control on the right side of the radio.
LSB: This button switches the Satellit to receive Lower Sideband SSB communications, and changes the tuning increment from 1 kHz to 100 Hz. It also enables operation of the CLARIFIER control on the right side of the radio.
MEM SCAN: Pressing this button allows the user to step through the frequencies stored in the currently selected MEMOFILE. If the ">" side of the rocker switch is selected, the radio will begin at the last selected page in the MEMOFILE and the page number will increase with each press of the "MEM SCAN >" button. If the "<" side of the rocker switch is selected, the radio will begin at the last selected page in the MEMOFILE and the page number will decrease with each press of the "MEM SCAN <" button.
SEARCH SEL: Pressing this button briefly will increase or decrease the reception frequency (once per press) by the appropriate increment for the band. Holding down this button will begin an automatic station search within a selected broadcast band. Pressing the ">" side of the rocker switch will cause the radio to scan up from the current frequency, while pressing the "<" side of the rocker switch will cause the radio to scan down from the current frequency. You cannot scan a user-defined range of frequencies with the Satellit 700, you can only scan over defined broadcast bands. (e.g. 49 M Band) These buttons are also used for several functions in conjunction with the MENU button.
AUTO: This button enables the timers in the Satellit to automatically turn the radio on and off. The actual timer settings (On and Off times) must be previously programmed via the MENU option. If the display indicates **TIMER when the AUTO push-button is pressed, neither Timer is programmed. If the radio is on and this push-button is pressed, the radio will switch off, in preparation for the next timer event.
TIME I/II: Used to display or set the two clocks in the Satellit.
A-Z/0-9: For assigning station names to a page of frequencies within a MEMOFILE.
MENU: For invoking the menu options - MW spacing, ON/OFF timer settings, turning the LCD display light On/Off, or copying MEMOFILES.
FREQ/m-BAND: For direct entry of frequencies or the Meter band of interest.
MEMORY FILE: For calling up previously stored frequencies of interest from a MEMOFILE.
CL: To clear the last input to the radio, or to return to normal radio mode (if using STO or MENU).
LINE OUT: L - The line level output for the Left channel in the radio. R - The line level output for the Right channel in the radio. These outputs are intended to drive an external amplifier or a tape recorder. These outputs should NOT be used to hook up a low impedance device such as a speaker.
HEADPHONE: This jack is to allow listening to the Satellit with Walkman type stereo headphones. Headphone impedance should be between 32 and 2K ohms. When headphones are used, the speaker in the Satellit is disconnected.
LOUDSPKR: This jack is supplied for driving two external speakers from the radio (it uses a stereo plug). When the external speakers are plugged into this jack, the speaker in the radio is disconnected. The Satellit 700 produces 2 x 1.5 watts into 7.5 ohm speakers.
EXT.DC: Allows connection of an external 9-12 V power source. The Positive (+) connection is the center conductor. If you plan to run the radio from this power source permanently, remove the batteries from the battery compartment, as they may leak with age and damage the radio.
RELAY: This jack allows remote control of an external tape recorder. It is also a standard 3 conductor stereo plug, with one common conductor, one normally open, and one normally closed contact. This allows the Satellit to automatically turn on an external tape recorder upon powerup.
DIST/LOC: When received signals are too strong, the front-end of the radio may overload, resulting in distorted audio. If the signal strength meter is full scale and the audio quality is poor, placing this switch in the LOC position reduces the radio's sensitivity and may improve reception. DX = Normal Sensitivity = Distant Stations LOC= Local Sensitivity = Nearby Stations
INT/EXT: Allows selection of the Satellit's whip antenna or an external shortwave antenna. The 700's EXT antenna input bypasses an RF preamp used for the built in whip antenna, to prevent overloading the front-end of the radio. CLARIFY: Used to fine-tune Single Sideband transmissions for optimum audio quality.
LOCKED This switch allows the user to lock the radio off, or to lock the radio with the current frequency and mode settings. When the radio is locked on, the only button which still functions is the ON/OFF switch. When this switch is on, pressing any of the other keys or the tuning knob will result in the display of the "LOCKED" message. This switch also switches on the lamp behind the LCD for approximately 10 seconds.
1) Tune to a Specific Frequency?
If you know the desired frequency that you wish to listen to, enter it in kHz on
the numeric keypad and press the Frequency/m-Band push-button. The Satellit will
immediately tune to that frequency. If you wish to enter the frequency in MHz,
enter the first digit, the ".", the rest of the frequency and press
Frequency/m-Band.
If you wish to tune to a certain band and scan for broadcasters, enter the wavelength of the band (in Meters) and press FREQUENCY/m-Band. Values for valid bands include the following - 90, 80, 75, 60, 49, 41, 40, 31, 30, 25, 22, 20, 19, 17, 16, 15, 13, 12, 11, and 10. When a valid band is entered and FREQUENCY/m-Band is pressed, the radio will tune to the frequency in the center of that band.
1) Set Timer #1?
Press MENU Press "Search Select >" or "Search Select <" until TIMER 1 is displayed. Press MENU, ON1 is displayed. Enter the desired turn on time. Press MENU, STATION is displayed. Enter the desired memory position (e.g. 1.12). If an alternate frequency is desired, press MEMO-AF. Press MENU to confirm, OFF1 is displayed. Enter the desired turn off time and press MENU. Press CL to exit MENU mode.
2) Set Timer #2?
Press MENU Press "Search Select >" or "Search Select <" until TIMER 2 is displayed. Press MENU, ON2 is displayed. Enter desired ON time. Press MENU, STATION is displayed. Enter desired memory position (e.g. 1.12). If an alternate frequency is desired, press MEMO-AF. Press MENU to confirm, OFF2 is displayed. Enter desired turn off time and press MENU. Press CL to exit MENU mode.
Notes: The Times set in this menu use the Clock which is CURRENTLY DISPLAYED. Once the timers are set, they may be activated by pressing the AUTO push-button.
If the timers are set to times which overlap, when either timer turns on (i.e. its ON time passes), the 700 switches to that timer's frequency, even if the other timer was already on. If the interrupting timer turns off before the original timer, the 700 will switch back to the original frequency and continue to play until that timer's OFF time passes.
3) Copy a MEMOFILE (EEPROM)?
Press MENU Press "Search Select >" or "Search Select <" until COPY_ is displayed. Enter number of MEMOFILE to copy frequencies FROM. The contents of this MEMOFILE will be written to the MEMOFILE in position (slot) #4. Press MENU to confirm. Copying progress is indicated by advancing asterisks. COPY_ is displayed when copying is completed. Press CL to exit MENU mode.
4) Turn the LCD Light On/Off? Press MENU Press "Search Select >" or "Search Select <" until LAMP is displayed. Press MENU to toggle the lamp off/on. Press CL to exit MENU mode.
The light will only illuminate the display when the Satellit is operated off of the AC line, and the bulb will burn out after a few years of continuous use, so it probably isn't a good idea to run it all the time.
5) Set the Radio to 9kHz/10kHz Reception on MW band?
Press MENU Press "Search Select >" or "Search Select <" until 9kHz or 10 kHz is displayed. Press MENU to toggle the tuning increment. Press CL to exit MENU mode.
4.1 How do I use the memory presets?
4.1.1 Recalling Stations From MEMOFILES
Recalling stations already stored in a Memo file is straightforward, so lets start there. MEMOFILE 0 is factory programmed and unalterable. If you press "0.8" and the MEMORY FILE button, your radio will tune itself to the BBC World Service at 3955 kHz.
If that frequency is noisy, or is not active at the current time, you can tune to alternate frequencies that the BBC broadcasts on by pressing the MEMO-AF button. The frequency displayed should now be 3975, and pressing MEMO-AF again and again should display 5975, 6045, 6180, and so on. Hopefully one of these frequencies will be in use and you may listen to the BBC.
If you have a wonderful memory, you may be able to remember that the
following stations are programmed into MEMOFILE 0, but there is an easier
way.....so don't dispair.
The easy way to locate the station of interest in a MEMOFILE is to key in "0.1" and MEMORY FILE, and then use the MEMORY SCAN rocker switch to scan up or down until you find the desired broadcaster. Then, press the MEMO-AF push-button until you locate the clearest signal.
Station presets stored in the MEMOFILE 1...MEMOFILE 4 EEPROMs may be recalled in a similar manner, and memory pages that do not have any station associated with it will indicate *FREE if selected. If the selected memory page is free the radio will not change frequencies. If you press the MEMO-AF push-button and the message *NO AF is displayed, no alternate frequencies are available for the current memory page.
Unfortunately, storing new frequencies in a Satellit 700 is not quite as straightforward as recalling them. To fully understand how the MEMOFILES work, you need to understand a little about how the memory in the EEPROM is organized....
            Station Name (8 Chars)      Alternate Frequencies ---------------

PAGE 1      Broadcaster #1      FREQ1   FREQ2   FREQ3   FREQ4   ....    FREQ8
PAGE 2      Broadcaster #2      FREQ1   FREQ2   FREQ3   FREQ4   ....    FREQ8
PAGE 3      Broadcaster #3      FREQ1   FREQ2   FREQ3   FREQ4   ....    FREQ8
    .           .               .       .       .       .       .       .
    .           .               .       .       .       .       .       .
    .           .               .       .       .       .       .       .
PAGE64      Broadcaster #64     FREQ1   FREQ2   FREQ3   FREQ4   ....    FREQ8
You can store information for up to 64 broadcasters for each MEMOFILE installed, so a Satellit 700 with all MEMOFILE sockets populated can store up to 256 pages of broadcasters, with a total of 2048 frequencies.
In addition to Frequency, the Satellit also stores information about the current IF Filter bandwidth, and its operating mode (LSB, USB, AM, AM-SYNCH). Note that when we recalled the BBC in the earlier example, it recalled FREQ1 by default when we entered "0.8" and MEMORY FILE. The Satellit always recalls the frequency stored in the first frequency position (FREQ1 in the previous table) when used in this manner, and the MEMO-AF push-button is used to tune to alternate frequencies.
Note that you can organize the pages in whatever manner you prefer, listing by broadcaster is merely one example. You could as easily label a page as "Europe" and store 8 favorite broadcasters on that page. You might also find it appealing to store frequencies based on UTC broadcast times.
1)  Select the desired MEMOFILE to check (e.g. 3. MEMORY FILE)

2)  Briefly press the STO push-button.

3)  If the station is already stored in the current MEMOFILE, the page number
    it is stored in will appear in the display.

4)  If the station is not listed in the MEMOFILE, the Satellit will display
    *NEW.
If the STO button is held down, the display will cycle through all of the
pages in the MEMOFILE which have the frequency listed. Note that the Satellit
only checks the current MEMOFILE for the frequency when you do this.
5.1.3 How can I Check the current
memory position so I don't overwrite something?
1)  Select the desired MEMOFILE to check (e.g. 3. MEMORY FILE)

2)  Enter the desired page number to check (e.g. 4)

3)  Press MEMORY FILE briefly.

2)  If the Page Number is blank, you will see *FREE, if a station is already
    programmed in this page, it will show the frequency stored there. The
    radio will also switch to that frequency, so don't be caught off guard!

4.1.4 How can I easily find a free memory location?

1)  The FREE push-button offers an easy and fast method to locate unused Page
    Numbers.  As long as you press the FREE button, unused Page Numbers in
    the current MEMOFILE are displayed one after another beside the *FREE
    indicator. If all memory Pages in the current MEMOFILE are occupied,
    *FULL will be displayed.

4.1.5 How can I clear all the Frequencies associated with a station?
1) Select the desired MEMOFILE (e.g. 3. MEMORY FILE) 1) Enter the Number of the desired memory page to clear by pressing the numeric push-buttons. 2) Press the FREE button for a couple of seconds. The display will indicate *FREE and the number of the memory page. WHEN YOU DO THIS, THE COMPLETE MEMORY PAGE IS CLEARED!
1)  Select the desired MEMOFILE (e.g. 3. MEMORY FILE)

2)  Enter the Number of the desired memory page by pressing the numeric
    push-buttons and then FREE briefly.

3)  Use the "SEARCH SELECT>" and "
4.1.7 How do I Store a Radio Broadcaster on a New Page?
1)  Tune your radio to the desired frequency, IF Filter setting, and
    operating mode (LSB, USB, AM, AM-SYNCH).

2)  Enter the number of the desired memory page by pressing the numeric
    buttons and then press the STO button for a couple of seconds.  As a
    confirmation, the display will briefly show *MEMO and the number of the
    selected memory page.

3)  Once the frequency is stored, you may annotate the station ID by pressing
    the A-Z/0-9 button, and then using the tuning knob to select the first
    letter of the identifier.  Once you've located the first letter, press
    the "SEARCH SELECT >" push-button to select the second letter.  Using the
    tuning knob, locate the second letter, and so on. You may enter up to 8
    characters per identifier.  When the desired identifier is complete,
    press the A-Z/0-9 push-button again. You have now identified a memory
    page with a particular broadcaster (or geographical region, or country,
    or city, or broadcast time, or whatever you want).
4.1.8 How do I store a Frequency in an Alternate Frequency Position?
1)  Tune to the Frequency of interest.

2)  Set the desired IF Filter setting, and operating mode (LSB, USB, AM,
    AM-SYNCH).

3)  Select the desired MEMOFILE to use (e.g. 3. MEMORY FILE)

4)  Select the desired page you wish to store the frequency into by using the
    numeric keys.

5)  Briefly press the STO push-button.

6)  The display will show the current memory page, with hyphens (---)
    denoting free alternate memory positions, and asterisks (***) denoting
    memory positions already in use.  The cursor (current position) will
    flash.

7)  Use the "SEARCH SELECT >" rocker switch to select a free alternate
    location.  (If you elect to press STO push-button when the cursor is
    flashing on an alternate frequency with an asterisk, that stored
    frequency will be overwritten with the new one).

8)  Press the STO push-button and the frequency is stored.

9)  Press the CL button to return to normal Radio mode.

    The first non-blank frequency on a memory page will be the frequency
    the Satellit tunes to when the memory page is called up with "#.##",
    MEMORY FILE.
The SLEEP push-button allows the radio to play for a pre-determined length of time before shutting it off. Repeatedly pressing the SLEEP button increases the play time in 10 minute increments up to 60 minutes maximum. When the SLEEP timer is active, pressing the SLEEP push-button will display the time remaining until the radio shuts off. To turn the radio off before the timer has elapsed, just press ON/OFF. To exit SLEEP mode without turning off the radio, press the SLEEP push-button until it displays '60' and then press it once more.
4.3 Clock Functions

The Clock may be set by following this sequence....

1)  Select TIME I/II to display the clock of interest.

2)  Enter the time with the numeric keys (e.g. 6:30a = 6-.-3-0)

3)  Press the TIME I/II push-button.  When this push-button is released, the
    clock will start running and the colon between the hours and minutes
    indicator will start flashing.
5. Q & A.... 1) Which radio is better, the Satellit 700, or the Sony
ICF-2010?
The easy (and truthful) answer is that both are good radios, and you really can't go wrong either way. Most people would agree that the Satellit provides better audio, better selectivity, better FM performance (and stereo), and superior SSB operation than the Sony (smaller tuning intervals, and the option of Manual AGC). Its shortcomings include higher cost, poorer sensitivity than the Sony, and a Synch detector that tends to rumble. If you are going to try to chase distant, low powered stations the excellent sensitivity of the Sony would probably make it the better choice. If your emphasis is on a portable receiver with good sensitivity and great fidelity, the Satellit 700 is the way to go.
Ha! Bet you thought I would try to dodge that question!
2) The audio is muted when I turn the tuning knob quickly, is this normal? Yes, afraid so. Bandscanning can be tedious with the Satellit because of this idiosyncrasy. The Sony 2010 has the advantage here also.
3) I can't store my favorite frequencies in MEMOFILE 0. What's wrong? You are trying to store your favorite frequencies into ROM (Read-Only Memory). ROM is programmed at the factory with a variety of frequencies, unfortunately most of them seem to be for European listening locations. To store your own favorites, try using MEMOFILE 1. (Or MEMOFILEs 2, or 3 if they are installed).
4) I intended to tune into Radio Netherlands via preset 0.5, but I'm receiving the Voice of America...What's going on? Frequency allocation of shortwave frequencies are not carried out like TV or AM/FM radio stations. Shortwave Broadcasters typically share frequencies, so at different times of the day different broadcasters may be on the same frequency.
5) I had previously stored a station in MEMOFILE 1.4 with the IF setting in WIDE mode. Now when its recalled, it's in NARROW mode! What's going on? If you call up a station from memory, and change the bandwidth or operating mode then the new settings are automatically stored in the current MEMOFILE position. If you called up a station, and have tuned the radio frequency slightly (Station ID has been removed from the Alphanumeric display), changing the modes or bandwidth has no effect on the MEMOFILE contents.
6) Can I recharge Ni-Cad batteries without removing them from the radio? Yes, make sure the Ni-Cads are installed in the radio correctly, and that the ACCUM/BATT switch in the battery compartment is switched to ACCUM. The ACCUM indicator on the LCD should light up if the switch is set for Ni-Cad batteries. If normal Alkaline "D" batteries are in the radio, the ACCUM/BATT switch should be set to BATT, and the ACCUM indicator on the front panel should NOT be lit up. Attempting to charge standard alkaline batteries may cause them to leak, possibly ruining your radio.
7) Is the Ni-Cad charging circuit built into the external power adapter or the radio? The charging circuit is built into the radio. An external adapter which provides 9-12 volts with at least 500 mA capacity will work fine.
8) How can I tell when the batteries in my radio are getting low? When the Satellit is turned on, the indication BATT/ACCUM will appear in the display under the signal strength indicator. The signal strength indicator will indicate the current condition of the batteries. When the batteries are near the low end of the solid bar under the indicator, the batteries are nearly depleted. Fresh batteries will result in a full-scale indication.
9) I'm trying to receive a shortwave station and another one is interfering with it. How do I reduce the interference? Select NARROW bandwidth and see if that does the job. If it doesn't, activate the Synchronous detector by pressing SYNCH. If the interfering station is below the station of interest, tune the Satellit upward until the USB indicator comes on.
If the interfering station is above the station of interest, tune the Satellit downward until the LSB indicator comes on.
You are now in the optimal configuration for receiving the signal of interest. If the station is still being interfered with, you are out of luck.
10) How can I connect an external antenna to my Satellit 700, it doesn't use a standard PL-259 connector?
A connector is supplied with the radio, but if it has been lost Universal Radio in Reynoldsburg, Ohio has a Satellit 700 antenna connector (P/N #0199) for $4.95. Their phone number is 800-431-3939.
The connector is a DIN type 45325, and is designed for use with 50 ohm or 75 ohm coaxial cable. The Radio Shack "European TV" adapter will plug into the Satellit connector, and effectively change the connection at the radio to a type F video/FM connector, which is easily dealt with.
11) When I switch my Satellit 700 into Synch mode, there is an annoying low pitched rumble. How can I reduce or eliminate this problem? Detune from the station's carrier frequency by 100 Hz either direction and see if that reduces the problem. You may also want to turn down the bass control. You may not completely eliminate the problem, it is a known shortcoming in the design/alignment of the Satellit 700.
12) When tuning Single Sideband signals, the transmissions still sound like
Donald Duck. What can I do to improve the sound? Make sure you are tuned to the
correct sideband (LSB or USB). For amateur frequencies below 10 MHz, LSB is
normally used. For amateur frequencies above 10 MHz, USB is normally used.
Commercial broadcast and Utility stations normally use USB.
Select Narrow IF bandwidth.
Tune the main tuning knob for the clearest reception, and then use the Clarifier
control on the right side of the radio to fine-tune for optimum audio. You
should be able to get good quality audio if you tweak it enough. Even the Narrow
IF filter in the Satellit is too broad for optimum SSB reception, which may
cause problems if there are several transmitters using SSB on nearby
frequencies. This is a shortcoming shared with most portables.
13) OK, the SSB transmission sounds clear, but the signal is fading badly. Now what? Turn the AGC control to manual and adjust it for best reception. The LCD display will indicate "MGC" when you are in Manual. Remember to turn it back to the Automatic AGC position when you're done.
14) How do I manually peak the pre-selector in the radio? While the microprocessor in the Satellit adjusts the pre-selectors in the radio based on the current frequency being monitored, it may be possible to improve reception by manually peaking it. To ensure the best performance when dealing with weak signals, tune the pre-selector network by pressing the MONO push-button and adjusting the tuning knob for maximum level on the Signal Strength indicator.
15) I'm trying to listen to a very weak signal but I can barely hear it. What can I do to improve the signal?
Make certain that the DX/LOC switch on the side of the Satellit is set to DX.
    Make certain that the AGC/MGC control is set to AGC.

    Select Narrow Bandwidth

    Peak the Preselector (see question #14)

    Turn down the treble
Use an external antenna. Radio Shack's wind-up reel antenna works quite well with the Satellit 700, improving signal levels without overloading the front-end of the radio. Note that attaching the antenna to the Satellit's whip allows the whip RF pre-amp to remain in the circuit, and provides a better signal than using the EXT jack on the side of the radio. The similar Sangean ANT-60 antenna should work well also.
16) Does selecting the external antenna jack disable the internal ferrite rod antenna for longwave and mediumwave reception? No, the external antenna jack is active for frequencies above 1612 kHz. The internal ferrite rod antenna is always in the circuit. Remember this trivia tidbit if you are trying to DX these bands with loop antennas.
17) Is there any easy way to recall the last frequency I recalled from a memofile? Yes, press the MEMORY SCAN push-button once.
18) Is there any easy way to recall the last frequency I manually tuned to? Yes, pressing 0 and FREQ/m-Band tunes to the last manually tuned frequency.
19) My radio has stopped responding to all keyboard commands. What do I do? If *LOCKED is displayed when a button is pushed, the LOCK switch on the left side of the radio is in the wrong position. Slide it to the UNLOCKED position. Make sure you have sufficient power to run the radio. Plug in the AC adapter and run it from the wall outlet. Does it work now? If it doesn't, the Microprocessor RESET push-button is located just to the left of the MEMOFILE sockets on the lower right side of the radio. Open the cover and press this button with the tip of a pen or pencil and see if the radio responds. Pressing this button will NOT affect the stations & frequencies stored in the MEMOFILES, however it will clear the clocks, last tuned station, and TIMER OFF and ON settings.
20) My Satellit 700 has developed a problem, how do I contact Grundig for
Service/Repair work? Contact: Lextronix, Inc. 3520
Haven Ave. Unit L Redwood City, CA 94063 415-361-1611 800-872-2228 from 8 AM to
4 PM PST on weekdays.
6.0 Messages
6.1 Indicators
*NO RDS The FM station the radio is tuned to is not broadcasting RDS signals, or the signals are too weak to receive reliably.
*RDS-Q When the RDS data error rate exceeds an acceptable level, the RDS call letter information is replaced by this error message. The actual error rate replaces the signal strength indication, if all 16 indicators are lit the error rate is 0%, if 8 indicators are
lit the error rate is 50% etc.
*NO AF No Alternative Frequencies are available for this broadcaster.
*PR-SEL The pre-selector may now be tuned manually with the tuning knob
for best reception. *MEMOXX This frequency is already stored in memory location XX.
*FREEXX Memory position XX is not occupied.
*NEW The frequency being stored is not yet stored in the current MEMOFILE.
*FULL All pages in this MEMOFILE are used.
*NO MEMO The current MEMOFILE is erased or has no entries.
*LOCKED The locking switch on the side of the radio is set to the "LOCKED" position.
6.2 Error Messages
**FILE The selected MEMOFILE is not installed in the radio.
**TIMER No On/Off times are programmed.
**TIME Time of day or On/Off times are not entered correctly.
**FREQ Frequency was not entered correctly.
**M-Band The Shortwave band was not entered correctly.
**MEMORY The Stations memory position was not correctly entered.
**ROM TAB When MEMOFILE 0 is selected, the STO and FREE keys do not function
normally. MEMOFILE 0 is Read Only Memory and may not be altered.
Specifications: Radio Netherland's Receiver Review Web Site at: http://www.rnw.nl/en/pub/rxshop/sat700.html Operation: Grundig Owner's Manual for the Satellit 700 Postings to the rec.radio.shortwave newsgroup and e-mail from the following fine folks:
RDS Milestones
![]()
Pre-developments start
![]()
First Field Trial at Bern/Interlaken, Switzerland
![]()
Tests start in Stockholm, Sweden Evaluation of 8 systems in Helsinki RDS Baseband Coding agreed Second Field Trial at Bern/Interlaken
![]()
Industry/Broadcasters meeting at EBU Juoin Industry/Broadcaster Field Trial in Munich, Germany RDS adopted by EBU and Industry - submitted to CCIR
![]()
First presentation of RDS in Detroit, USA Ford starts RDS car radio development RDS Specification EBU 3244 published
![]()
Large scale pre-operational trial in Germany EBU recommends RDS introduction Industry/Broadcasters confirm first receivers target from 1987
![]()
First presentation of RDS at NAB Dallas, USA RDS CCIR Recommendation published
![]()
Ireland, France and Sweden introduce RDS First RDS Receivers shown at IFA Berlin, Germany Volvo markets World’s first RDS Car Radio
![]()
Austria, Belgium, Denmark, Germany, Italy and UK introduce RDS Blaupunkt, Grundig and Philips mass produce RDS Car Radios
![]()
RDS enhancements: EON developed and tested in UK Portugal, Netherlands, Norway and Switzerland introduce RDS Presentation of RDS in Washington DC, USA and at NAB Las Vegas, USA
![]()
First presentation of RDS at Broadcast Asia, Singapore and in South Africa RDS European Standard CENELEC EN 50067:1990 published
![]()
RDS EON Receivers shown at IFA Hong Kong introduces RDS First presentation of RDS in China
![]()
RBDS Standard completed in USA South Africa introduces RDS RDS European Standard CENELEC EN 50067:1992 published
![]()
RDS portable radios become available RDS Forum created
![]()
RDS-TMC endorsed by EC for Trans European Road Network DGPS implemented in Sweden
![]()
RDS Paging Assocation created EIA activated RBDS promotion in USA
| Model | Price(DEM) | Delivery | PI | PS | AF | TP | TA | CT | PTY | PTY31 | PIN | RT | M/S | EON | EONAF | EONTA | EONPTY | Notes |
| Ocean Boy 500 | 169.00 | Aug-96 | X | X | X | X | X | |||||||||||
| Yacht Boy 500 | 499.00 | Sep-93 | X | X | X | |||||||||||||
| Satellit 700 | 959.00 | Dec-91 | X | X | X |
The list(s) of alternative frequencies give information on the various transmitters broadcasting the same programme in the same or adjacent reception areas, and enable receivers equipped with a memory to store the list(s), to reduce the time for switching to another transmitter. This facility is particularly useful in the case of car and portable radios.
Time and date codes should use Coordinated Universal Time (UTC) and Modified Julian Day (MJD). If MJD = 0 the receiver should not be updated. The listener, however, will not use this information directly and the conversion to local time and date will be made in the receiver's circuitry. CT is used as time stamp by various RDS applications and thus it must be accurate.
These bits indicate which possible operating modes are appropriate for use with the broadcast audio and to indicate if PTY codes are switched dynamically.
RDS uses its own country codes. The first most significant bits of the PI code carry the RDS country code. Their four bit coding structure only permits the definition of 15 different codes, 1 to F (hex). Since there are much more countries to be identified, some countries have to share the same code which does not permit unique identification. Hence there is the need to use the Extended Country Code. The ECC consists of eight bits.
This feature can be used to update the information stored in a receiver about programme services other than the one received. Alternative frequencies, the PS name, Traffic Programme and TrafficAnnouncement identification as well as Programme Type and Programme Item Number information can be transmitted for each other service. The relation to the corresponding programme is established by means of the relevant Programme Identification. Linkage information, consisting of four data elements, provides the means by which several programme services may be treated by the receiver as a single service during times a common programme is carried. Linkage information also provides a mechanism to signal an extended set of related services.
The EWS feature is intended to provide for the coding of warning messages. These messages will be broadcast only in cases of emergency and will only be evaluated by special receivers.
This refers to data to be decoded only by the operator. Some examples noted are identification of transmission origin, remote switching of networks and paging of staff. The applications of coding may be decided by each operator itself.
This is a two-state signal to provide information on whether music or speech is being broadcast. The signal would permit receivers to be equipped with two separate volume controls, one for music and one for speech, so that the listener could adjust the balance between them to suit his individual listening habits.
The Open Data Applications feature allows data applications, not previously specified in EN 50067, to be conveyed in a number of allocated groups in an RDS transmission. The groups allocated are indicated by the use of type 3A group which is used to identify to a receiver the data application in use in accordance with the registration details.
This information consists of a code enabling the receiver to distinguish between countries, areas in which the same programme is transmitted, and the identification of the programme itself. The code is not intended for direct display and is assigned to each individual radio programme, to enable it to be distinguished from all other programmes. One important application of this information would be to enable the receiver to search automatically for an alternative frequency in case of bad reception of the programme to which the receiver is tuned; the criteria for the change-over to the new frequency would be the presence of a better signal having the same Programme Identification code.
The code should enable receivers and recorders designed to make use of this feature to respond to the particular programme item(s) that the user has preselected. Use is made of the scheduled programme time, to which is added the day of the month in order to avoid ambiguity.
This is the label of the programme service consisting of not more than eight alphanumeric characters which is displayed by RDS receivers in order to inform the listener what programme service is being broadcast by the station to which the receiver is tuned. An example for a name is "Radio 21". The Programme Service name is not intended to be used for automatic search tuning and must not be used for giving sequential information.
This is an identification number to be transmitted with each programme item and which is intended to specify the current Programme Type within 31 possibilities. This code could be used for search tuning. The code will, moreover, enable suitable receivers and recorders to be pre-set to respond only to programme items of the desired type. The last number, i.e. 31, is reserved for an alarm identification which is intended to switch on the audio signal when a receiver is operated in a waiting reception mode.
The PTYN feature is used to further describe current PTY. PTYN permits the display of a more specific PTY description that the broadcaster can freely decide (eg PTY=4: Sport and PTYN: Football). The PTYN is not intended to change the default eight characters of PTY which will be used during search or wait modes, but only to show in detail the programme type once tuned to a programme. If the broadcaster is satisfied with a default PTY name, it is not necessary to use additional data capacity for PTYN. The Programme Type Name is not intended to be used for automatic PTY selection and must not be used for giving sequential information.
The RP feature is intended to provide radio paging using the existing VHF/FM broadcasts as a transport mechanism, thereby avoiding the need for a dedicated network of transmitters. Subscribers to a paging service will require a special pocket paging receiver in which the subscriber address code is stored.
This refers to text transmissions coded in accordance with annex E, primarily addressed to consumer home receivers, which would be equipped with suitable display facilities.
This is an on/off switching signal to indicate when a traffic announcement is on air. The signal could be used in receivers to:
After the end of the traffic announcement the initial operating mode will be restored
The transparent data channels consist of 32 channels which may be used to send any type of data.
This feature is intended to be used for the coded transmission of traffic information. The coding is separately defined by a set of standards issued by CEN [ENV 12313-1 and prENV 12313-2].
This is a flag to indicate that the tuned programme carries traffic announcements. The TP flag must only be set on programmes which dynamically switch on the TA identification during traffic announcements. The signal shall be taken into account during automatic search tuning.
- RDS Test Mode info (S.700/technical)

Memory upgrade information / S.700
 Memory chips can be bought from DIGI-KEY in USA ,just enter 24LC16B/P-ND in the
search-field. The chips cost under dollar each ,and there's a
handling fee of 5 dollars minimum.
Memory chips can be bought from DIGI-KEY in USA ,just enter 24LC16B/P-ND in the
search-field. The chips cost under dollar each ,and there's a
handling fee of 5 dollars minimum.
![]()
Centre BFO(SSB)/no-hum modification
This information is based on the
![]() Shortwave radio page (only
the pictures are updated by Knut Otterbeck)
Shortwave radio page (only
the pictures are updated by Knut Otterbeck)
Firstly a word of warning, please don't attempt this if you are not sure of what you are doing. Neither myself or Donald Reeve can take any responsibility for what you might do to your radio - if you do this, you do it under your own volition and we accept no responsibilty for what may happen. Having said that, I find it hard to imagine getting in such a mess that you can't get out of it again, as long as you use the right screwdriver and only touch the trimmer/pot shown, there's no need to remove the case or warm up your soldering iron!
A word of warning! If you have tuned all your utility frequencies in off frequency to allow for the BFO offset, you will have to program them in again spot on frequency!
All we are trying to do is adjust the BFO circuit to give no hum when you use USB/LSB on an AM bradcast station. This centres the BFO circuitry and allows you to enter a frequency dead on and just select USB/LSB. Mine was so far out that I couldn't tune the BFO to the station unless I tuned off frequency.
The Radio (back view):

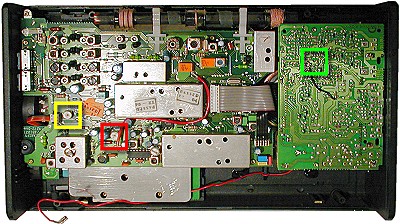
There are three holes in the back of the set where you can adjust what's under them. The one we are interested in is the one circled in YELLOW, to the left of the tilty stand thing no-one uses. Tune the radio to one of the big boys in your area, a frequency you can trust that will be bang on (I chose Deutsche Welle, you can use BBC, RCI - anything as long as its a decent signal and one you can trust is on frequency). Make sure the BFO fine tune roller is in the centre (dented) - This is very important, also, as Donald points out, it's better to have the Bass turned right up, helps you hear the note better, then:
Switch to USB or LSB whichever gives you the best note.
Carefully put your jewellers screwdriver (maybe a plastic handled one would be best but it doesn't seem to have any capacitance effect)
Turn left/right until the note lowers and finally dissapears.
Switch to the opposite sideband mode (USB if you used LSB) and check that there is no tone there. And, that's it!
note. The top right (circled in GREEN) adjustment seems to adjust the gain for the pre-amplifier, all the way left is high, right is low. (Not that I propose changing it!)
That's it. The thing doesn't wander and on my set really helped bring in the
stations and seemed to improve reception generally. Don'ald says that the hole
on the right (circled in GREEN) seems to adjust the pre-amp and doesn't have a great effect, the
hole under the stand (circled in RED) effects the FM scanning (badly) and the S-meter. I'd love
to find other tips and adjustments, so if you know, please drop me a line. You
can also email me about this procedure if you wish and I'd like to hear how it
improved your radio reception - please write and let me know. Please email me if
you have any tips on the Satellit 700, I would like to post them on this site,
if you have any Grundig tips and want to keep them on your site, let me know
too, I'll put in a link here for you.
Non-muted tuning modification / S.700
There is not a perfect radio made. There are opportunities to improve a radio
by modifications to circuitry. For example: most digital radios will mute when
you tune them. This makes it much harder to find a weak station. A non-muted
tuning circuit is much more enjoyable to use.
WARNING! Modifying your radio will technically void your factory
warranty.
Tuning modifications can be performed on the Grundig Satellit 700:
If you would like to perform your own modifications we can supply you with clear and easy to follow instructions for $15.00. Parts are included. You must have good eyesight and a steady hand. It requires the use of a small hobby knife, soldering and drilling a hole.
![]() (Online catalogue/Radios/Shortwave/Radio
Modifications)
(Online catalogue/Radios/Shortwave/Radio
Modifications)
- DEMO MODE ( scrolling text/show-off :)
The Demo Mode can be turned on- and off by entering the numbers
123456 _before_ turning on the power. Reverse the action to turn
Demo Mode off .....